
How to Prepare Your Roller Before Painting


Choosing the right roller will make all the difference to the final results of your next painting project. But with all the different roller sizes, fabrics and nap lengths available, knowing which one to use can feel confusing. Luckily Monarch has you covered!

The key is to match your roller to the surface you’re painting and the finish you want to achieve. Whether you’re refreshing interior walls, painting doors or tackling rough exterior brickwork, the right roller can help you apply paint more evenly and work with greater confidence.

Choosing the right roller is an important part of planning your project. Before you begin, check three things:

  1. Nap length: Does the roller suit the surface and the finish you want?
  2. Roller material: What material is needed for the surface being painted?
  3. Roller width: Is the roller the right size for the area?

In this guide, we’ll explain how to choose the right roller by looking at nap length, roller material and width, so you can find the right roller needed for your next project.

Understanding Nap Length

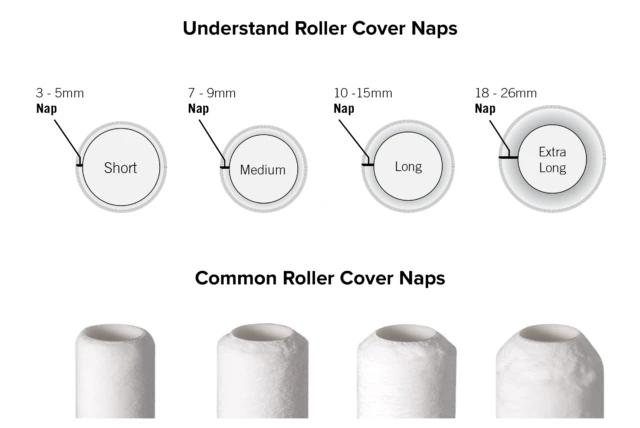
The first step is understanding what nap length is. Nap refers to the thickness or length of the fabric on a roller cover. Different nap lengths are designed for different surfaces.

As a general rule, shorter naps suit smoother surfaces, while longer naps are designed for rougher surfaces. A thicker nap can hold more paint and reach into the uneven areas of textured surfaces.
Size and style

3-5mm Nap: Doors, Cupboards and Smooth Finishes

3-5mm Nap: Doors, Cupboards and Smooth Finishes

A short-nap roller is a practical choice when you want a very smooth finish on smaller, smooth surfaces. Monarch recommends this nap range for doors and cupboards, particularly when using water-based or oil-based gloss and semi-gloss paints.

Suitable for:

  • Doors and cupboards
  • Smooth timber surfaces
  • Projects where a smooth finish is important
9-10mm Nap: Feature Walls and Smooth Walls

9-10mm Nap: Feature Walls and Smooth Walls

If you’re painting a feature wall or want a very smooth finish on an interior wall, a 9-10 mm nap roller is worth considering. These roller covers are designed help reduce roller stipple compared with a longer nap roller.

Suitable for:

  • Feature walls
  • Smooth interior walls
  • Projects where you want less visible roller texture
12-15mm Nap: Everyday Walls and Ceilings

12-15mm Nap: Everyday Walls and Ceilings

For many interior painting projects, a 12-15mm nap roller is a great option. These rollers are commonly used for walls and ceilings, particularly with flat and low-sheen paints.

Suitable for:

  • Living room and bedroom walls
  • Interior ceilings
  • Larger painting projects around the home
20mm+ Nap: Rough and Textured Surfaces

20mm+ Nap: Rough and Textured Surfaces

Rough and textured surfaces need a roller that can reach into the uneven areas. Monarch recommends thicker-nap rollers for surfaces such as MDF, render and brickwork. These rollers can hold more paint and help it reach into deeper surface contours.

Suitable for:

  • Brickwork
  • Render
  • Rough exterior surfaces
  • Textured walls

Choose the Right Roller Material

Nap length is only one part of the decision. The roller fabric also matters when choosing a roller for your project.

Monarch’s guide highlights four roller materials in its range: Ultra Microfibre, Expertech SPI-Weave, Expertech Draylon, and Seamless Foam.


Pro Tip: Check the product packaging for suitability before making your choice. Choosing a roller designed for your task can help you approach your project with greater confidence.


Ultra Microfibre: Delivers smooth, even coverage with minimal fibre loss, excellent shape retention, and fast paint release for a flawless finish.

SPI-Weave: An open weave design and is the perfect synthetic fabric for providing excellent pick-up and release and maximum coverage to get your paint job done faster.  Highly resilient and perfect for applying epoxy floor paints and coatings.

Draylon: is the perfect synthetic fabric for providing a smooth and even finish. Suitable for use with water-based and oil-based paints.

Seamless Foam: Delivers a super smooth finish. It gives the best results when used with gloss and semi-gloss paint, recommended for application on doors, trims and cupboards. 

Quick tip: Before choosing a roller, consider how smooth or rough your surface is. Matching the nap to the surface is an important step towards achieving the finish you want.

Select the Right Roller Width

The width of your roller affects how much surface you can cover with each pass. A smaller roller is useful for compact areas, while a wider roller is suited to larger surfaces. Monarch’s guide groups roller widths into three main ranges. Think about the size of the area you are painting before you purchase your roller cover. Selecting a suitable roller width can make the job more manageable.

What Roller Width Do I Use

75-100mm: Small, Detailed Areas

75-100mm: Small, Detailed Areas

A narrow roller is suited to smaller painting jobs where control matters.

Interior uses:

  • Cupboards
  • Door trims
  • Windows
  • Furniture

Exterior uses:

  • Fence posts
  • Rails
130-180mm: Medium-Sized Surfaces

130-180mm: Medium-Sized Surfaces

A medium-width roller is a practical option for areas that are too large for a small roller but may not need a full-sized one.

Interior uses:

  • Doors
  • Small walls
  • Benchtops
  • Stairs

Exterior uses:

  • Eaves
  • Pergolas
230-270mm: Large Surfaces

230-270mm: Large Surfaces

For larger painting projects, a wider roller can help you cover more area with each pass.

Interior uses:

  • Walls
  • Ceilings
  • Large surfaces

Exterior uses:

  • Fences
  • Concrete floors
  • Brickwork

Match Your Roller to Your Project

If you’re still unsure which roller to choose, start with the surface you’re painting.

Use these examples as a guide:

  • Painting doors or cupboards? Consider a 3-5mm nap roller and a narrower width for a super smooth finish on smaller areas.
  • Painting a feature wall? Consider a 9-10mm nap roller if you want a smooth finish.
  • Refreshing interior walls and ceilings? A 12-15mm nap roller is a common choice for these surfaces.
  • Painting brick or render? Look at a 20mm nap roller designed for rough and textured surfaces.
  • Painting a fence or pergola? Choose the roller width that suits the area, and match the nap to the surface texture.

Remember that these recommendations are a starting point. Always check the roller’s product details to confirm it is suitable for your surface and paint.

How to Prepare a Paint Roller Before Painting

Preparing your roller before you start helps you get ready for a smoother, more consistent application. Follow these simple steps to prepare your roller for your project.

Step 1: Rinse the roller cover

Rinse the roller thoroughly with water to remove loose lint and residue. Monarch recommends pre-rinsing the roller before painting.

Step 2: Remove excess moisture

Shake or spin the roller to remove excess water. The roller should be damp, not dripping wet, before you begin painting.

Step 3: Attach the roller to the frame

Slide the roller cover onto the roller frame and make sure it is fitted securely so it turns freely.

Step 4: Load the roller with paint

Pour paint into your tray, then roll the roller cover through the paint and across the ridged loading area. This helps distribute the paint across the roller before you start.

Pro Tip

A pre-rinsed roller can pick up and apply paint better than a dry roller. Always spin out excess moisture before loading it with paint.

Clean and Store Your Roller Properly

After you have finished painting clean your rollers properly.

Step 1: Remove excess paint

You can use the 5 in 1 Multi Tool to extract excess paint from your roller, before rinsing to ensure that it can be used again for your next project.

Step 2: Wash after use

If you are using water-based paint, immediately rinse the roller under running water until clean. If an oil-based paint was used, rinse the roller in the recommended solvent, then wash in warm soapy water until clean.

Step 3: Remove excess liquid

Spin or shake out excess liquid.

Step 4: Maintain and store

Leave rollers to fully dry before putting them away. Store your clean roller covers in a cool, dry place. Monarch’s roller covers packaging doubles as a handy storage bag/container to keep your roller cover fresh between uses.

More How To Tips